Sample No. 0227
Sew a Cozy Bormio Faux Fur Cape Coat with a Free Sewing Pattern
Make a warm, polished winter cape with welt pockets, a detachable collar and a two-pull zipper using this free intermediate sewing pattern.

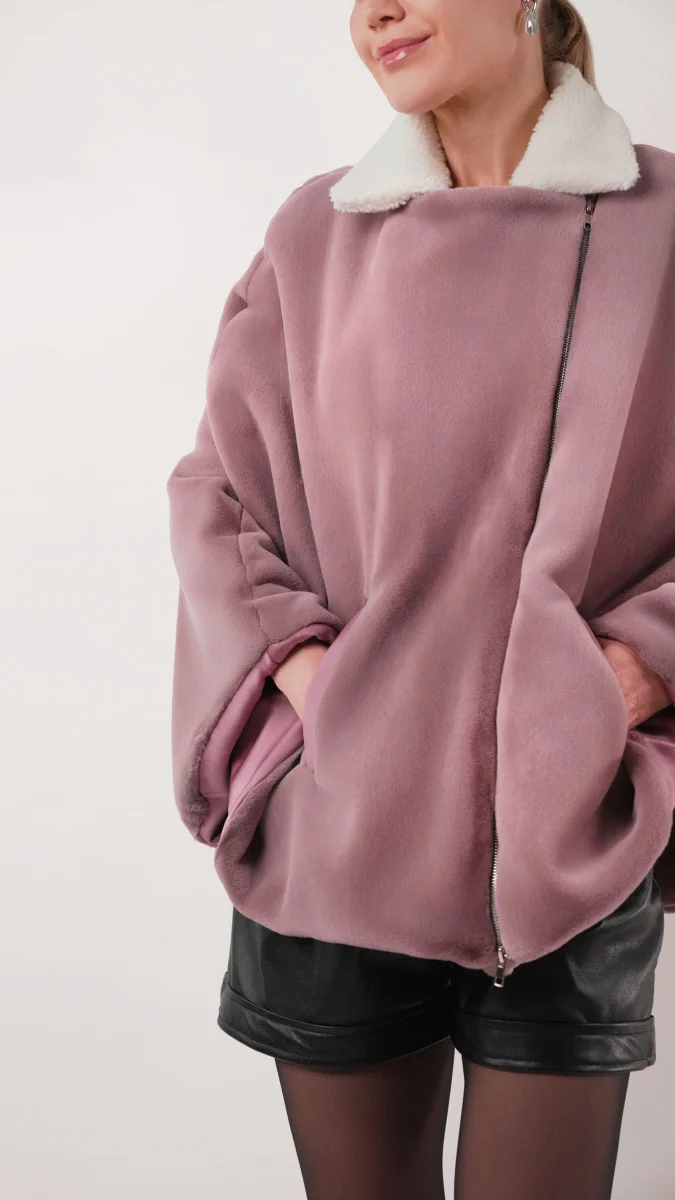
The Bormio Faux Fur Cape Coat is built around one useful idea: a dramatic winter layer should still be comfortable to wear. Inspired by Bormio, Italy, and its alpine resorts, this free sewing pattern pairs the warmth of a cape with practical details, including welt pockets and a detachable faux shearling collar. The sample uses dense, plush faux rabbit fur and a soft faux shearling collar.
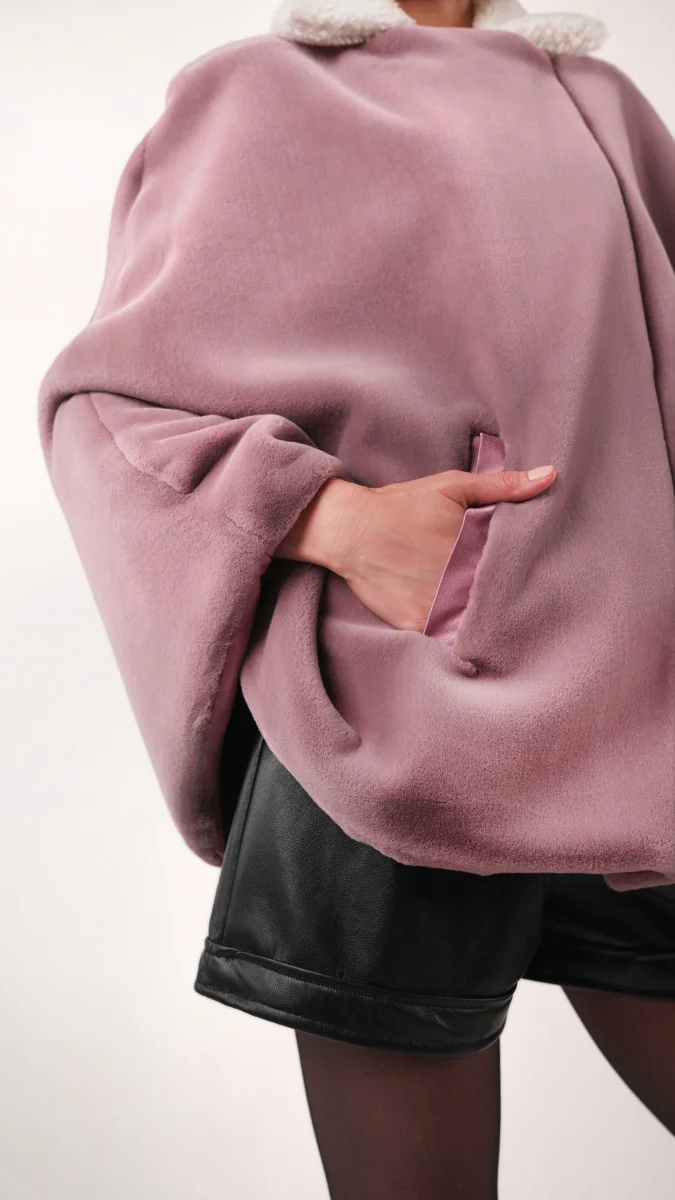

The design’s most distinctive feature is its two-pull zipper. Zip it to the top for more coverage, or open it from the hem to change the cape’s shape and let in air. That flexibility gives you more control over how the coat moves and wears. It’s a thoughtful detail in a garment that could otherwise feel more like a blanket than outerwear.
For a winter getaway or an everyday cold-weather outfit, the Bormio brings a polished look to a warm, loose-fitting layer. The pattern is rated intermediate, and you’ll need a double-pull zipper to make it as designed.


Materials, sizing and pattern download
The materials list below follows the sample, while the pattern download includes technical drawings and a size chart. You can use the suggested fabrics or choose another heavyweight option to make the cape your own.

Materials used for the sample
The quantities below are for a size small. Use the “SHOP THIS LOOK” box for estimates in other sizes.
- 2 yards of Recycled Polyester Faux Rabbit Fur – Mauve
- 2 yards of Crepe Back Satin by Alex Perry – Rose Pink – Designer Deadstock
- 0.5 yards of Recycled Polyester Faux Shearling – Off-White
- 1 Steel Gray and Silver T5 Open End Metal Zipper with Two Pulls – 36″
- 1 Dritz 2 Sew on Snaps – 30mm
- 1 Dritz Nickel Sew On Snaps Size 1 – 8 ct
- 2 Gutermann Sew All Thread 100m – 914 Lilac
- MDF567 – Bormio Faux Fur Cape Coat Sewing Pattern (free download below)
Other products used
Shopping tip: The “SHOP THIS LOOK” box initially shows quantities in full yards. To order a half yard, reduce the quantity with the minus button; then click “ADD TO CART” to add the materials. The system only displays full-yard quantities by default.
Choosing another fabric
This pattern calls for heavyweight fashion fabric. Minky, fleece, boiled wool and wool coating are suggested alternatives, with room to choose a different color or texture.
Get the free pattern
Enter your name and email in the form below to receive the Bormio Faux Fur Cape Coat pattern link by email. Mood Sewciety Patterns sends the PDF download for both A4 and letter-size printing with the subject line “Your Free Download from Mood Sewciety – The Bormio Faux Fur Cape Coat.”
© MoodFabrics.com / MoodSewciety.com – Mass production, resale, or distribution of this pattern in any form is strictly prohibited.
Choose your size
The sizing guide reflects the pattern’s suggested design and wearing ease. You can also select a size using the finished garment measurements, then blend between sizes if needed. Measure the printed pattern pieces to check the fit you want and make adjustments before cutting your fabric. For a more reliable fit check, sew a test garment in a similar fabric.
The body measurements chart is for reference. The guide recommends using the approximate finished garment measurements chart (chart 2), considering neck circumference, shoulder width and your preferred amount of ease. Read all the instructions before cutting.

How to sew the Bormio Faux Fur Cape Coat
These instructions take you through construction from the lining to the finished cape.


Three tips for sewing faux fur
- After sewing the lining, put the iron away. Heat can melt or burn faux fur and alter the pile.
- When cutting, snip through the backing only instead of cutting straight through the pile. This helps keep loose faux fur from spreading around your sewing space.
- Check that the pile runs in the same direction on every pattern piece before cutting.


Pattern pieces and fabric cuts
- (A) Back
- Fabric: cut 1 on fold
- Lining: cut 1 on fold
- (B) Front right
- Fabric: cut 1
- Lining: cut 2 mirrored
- (C) Front left center
- Fabric: cut 1
- (D) Front left side
- Fabric: cut 1
- (E) Collar
- Fabric: cut 2 mirrored
- (F) Welts
- Fabric: cut 4
- (G) Pockets
- Lining: cut 2 mirrored sets

Use a 1/2″ seam allowance on all seams unless a step specifies otherwise.
Step 1: Sew the lining side seams
- Place the front cape lining pieces right sides together over the back lining piece.
- Pin the shoulder and side edges of the fronts to the back.
- Sew the shoulder and side seams.
- Turn the lining right side out.
- Press the side seams open and flat.


Step 2: Attach the zipper to the left front
- Arrange the two front left coat pieces as shown in the photo.
- With right sides together, pin the zipper to the straight edge of the front left side piece.
- Sew along the zipper tape edge nearest the raw edge of the coat piece.
- Lay the center left coat piece right sides together with the side piece, sandwiching the zipper between them.
- Pin or clip the pieces, then sew the center piece to the side piece, catching the zipper tape in the seam.
- Unfold the center piece from the left front.

Finish the zipper, then join the coat
The zipper needs a coat front on both sides before you move on to the seams. The order matters: sew one side of the zipper tape to the left front, sandwich it between the left front and center front pieces as shown, then unfold the pieces. Next, attach the right front to the free zipper tape. Check that both sides lie flat before continuing.


Step 3
FRONT RIGHT SIDE
- Set the right front beside the left front, matching the layout shown below.
- Place its center-front raw edge against the unsewn side of the zipper tape, right sides together.
- Pin the fabric to the tape, then sew the right front in place.
- Unfold the right front away from the left side.


Step 4
COAT SIDE SEAMS
- Lay the front coat pieces over the back, right sides together.
- Pin the shoulder edges and side edges in place.
- Sew the front to the back along the side seams.


Build the welt pockets
The pocket opening is the fussy part of this section. Take care with the overlap: from the outside, the welt nearer the zipper must sit over the welt nearer the coat side. That arrangement makes the pocket opening face toward the side seam, where your hand can reach it.
Step 5
WELT POCKETS
- Fuse interfacing to the wrong side of each welt piece. Fold each welt in half lengthwise, wrong sides together, and press.
- On the wrong side of the front coat pieces, mark each pocket position. The marking should match the folded welt’s dimensions, minus the seam allowances.
- Cut along the center of each marked opening. Snip diagonally into the ends to form triangular notches, stopping at the marked corners.
- With right sides together, pin the long raw edge of each welt to the corresponding long edge of the opening.
- Sew along both marked long edges, one seam at the top and one at the bottom.
- Turn the welts to the inside. From the coat’s right side, confirm that the zipper-side welt overlaps the side welt so the pocket opening faces the coat’s side.
- Pin the short ends of the welts to the triangular notches and stitch them together.
- Check from the right side that the welt lies flat. Repeat on the other front piece.


Step 6
POCKET BAGS
- Place the pocket bag pieces right sides together and stitch around them, leaving 1 inch unsewn at the top and bottom of the pocket opening. This gap lets the two bag pieces separate at the opening.
- Pull the two sides apart at the hand opening.
- Pin one side of the pocket bag to each of the welt seam allowances.
- Sew the bag pieces to the welt allowances. Keep these seams off the coat front itself.


Join the lining to the coat
Leave an opening at the hem so you can turn the cape right side out. That small gap is what makes the enclosed lining possible; sew the rest of the perimeter first, then use the opening to turn the garment.
Step 7
ATTACH LINING
- Place the main coat inside the lining with right sides facing.
- Pin around the neck, center-front opening, and hem. Leave a gap along the hem for turning.
- Sew around those edges, stopping before the hem gap.

The finishing work is what makes this cape practical to wear: cover the exposed zipper ends, close the turning gaps neatly, and line up the snaps before you sew them down. A little care here keeps the hardware from rubbing against you and helps the collar sit evenly.

Finish the zipper and hem
Before turning the cape right side out, trim the zipper tape at the neckline. Cut a small piece from the zipper’s trimmed end, long enough to fold around the exposed zipper end. Pin it in place, then stitch it down. That fabric cover keeps the metal teeth from catching the lining or irritating your skin.


Turn the cape right side out through the opening left in the hem. Close that gap by hand with a ladder stitch, joining the lining to the outer fabric. Keep the stitches small; when you draw them snug, the seam should nearly disappear.


Make the collar
Place the collar pieces with their right sides together and sew around the edges, leaving a small opening along the bottom. Clip the corners to reduce bulk, then turn the collar right side out. Use a point turner to shape the corners, taking care not to push through the fabric. Finish by hand stitching the opening closed with a ladder stitch.


Attach the collar and front snaps
Sew five snap studs along the collar’s bottom edge: one at each corner, one centered, and one between the center and each end. Even spacing matters because the matching receivers will go on the cape neckline.


For the large front closure snaps, first pin-mark where the neckline of the outer cape layer overlaps the inner layer. Hand sew the oversized snaps to the inside of the outer layer and the outside of the inner layer. Keep the stitches hidden from the garment’s exterior.


Finish by sewing five snap receivers into the lining along the neckline. Match their spacing to the five studs on the collar so the pieces meet cleanly when fastened.


The finished Bormio cape
That completes the Bormio Faux Fur Cape Coat. The alignment check is easy to rush, but it’s what lets the collar fasten evenly and stay in place. Share the fabrics and colors you chose with #MoodBormioPattern and #MadeWithMood, and tag @MoodFabrics. You can also download the free sewing pattern and show a friend what you’ve made.


Find your next sewing project
Mood offers more than 550 free sewing patterns, so there’s plenty to choose from after this cape. If you’ve made the Bormio, share what you thought and where you plan to wear it. For another project, browse the free sewing patterns, or try the Dresden Shorts pattern for a faux leather make.


