Sample No. 0275
Give Flat PNG Designs a Knit, Cross Stitch or Quilted Look with ChatGPT
Turn a transparent PNG into a faux knit, cross stitch or quilted design, then print it with or without a UV printer.

A flat PNG can keep its original shapes and colors while taking on the look of chunky knitting, cross stitch, quilting, leather or another surface. ChatGPT texture prompts create that visual change, and a UV printer can add physical height to the finished print. The same artwork also works with ordinary flat printing methods.
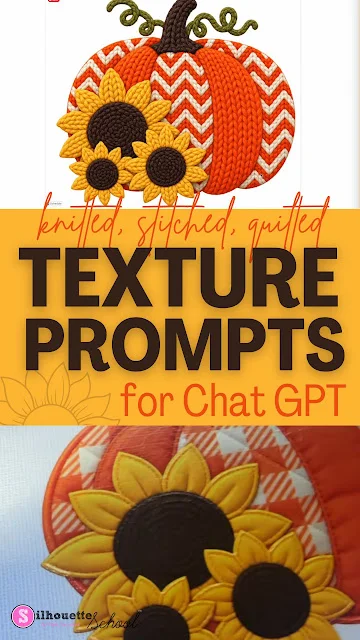
Start with a PNG and a texture prompt
Choose a PNG, ideally one with a transparent background, and copy the prompt for the texture you want. Paste it into ChatGPT, upload the design and let it process the image. The result is a new version with a different surface appearance; the underlying design’s shapes and colors stay the same.
There are 11 effects in all. Two prompts, for embroidery and chunky knit, are available free in the free tools and resources section at Silhouette U. The other effects are described as part of the prompt set, but no additional prompt access details are specified here.
Processing takes about a minute or two. Check the result closely, especially along the edges. If an edge needs more finishing, ask ChatGPT to make it more finished. That follow-up can produce a revised version without requiring you to repeat the whole process from the beginning.
Match the effect to the print
Texture and relief both add a dimensional look, but they worked differently for the examples described here. Texture gave the cross stitch and chunky knit designs a little extra chunkiness, so it was used for those effects. Relief was used for the quilted design. In xTool Studio, relief uses credits from an xTool account, and its 3D preview lets you inspect the apparent dimension before printing.
For a physical print, download the finished design as a transparent PNG and bring it into xTool Studio. The example was printed on an xTool O1 Omni Dual. The artwork included white, so the ink mode was set to white and color. The quilted print took about 10 to 12 minutes and came off the printer with a stitched appearance.
That timing and print result describe one project setup; the time for another design or printer may differ. The practical decision is whether you want the image to look textured on the page or to have raised dimension. Texture was the better fit for the knit and cross stitch samples, while relief supplied the depth used for the quilted sample.
Use the design without a UV printer
A UV printer isn’t required to use the textured artwork. Once saved as a PNG, the design can be used with sublimation, DTF, DTG, stickers or plain paper. These methods retain the faux knit or stitch appearance in a flat print. A UV printer adds real height, while the texture itself comes from the image.
This distinction helps when choosing a workflow: make the textured PNG first, then decide whether the project calls for a flat printed surface or a raised finish. If you’re printing the quilted version with relief, preview the dimension in xTool Studio before committing credits and time to the print. For cross stitch and chunky knit, the texture effect already supplied the added visual bulk in the example.
What to check before printing
Keep the PNG’s transparent background when preparing the file, and review the generated edges before moving into print software. A small edge adjustment can be requested directly in ChatGPT. For artwork containing white, check the ink mode; the demonstrated design needed white and color enabled. Then choose texture or relief according to the result you want to see and feel.
The workflow leaves room to use the same design across different projects. A single textured PNG can go to a UV printer for physical dimension or to a flat printing method for a surface effect. Start with the texture that suits the motif, inspect the edges, and choose the print method based on whether actual height matters to your finished piece.


